With so many popular NPS sites transitioning to lottery systems due to extremely high demand for permits, I’ve decided to adopt a new strategy: enter every lottery every year until I eventually get them all.
Given my past success with NPS lotteries – or, rather, my complete and total lack of success – I entered the Angels Landing lottery with very low hopes. So low, in fact, that I didn’t even bother to actually plan this trip to Zion because I figured it wouldn’t be happening.
So imagine my surprise when an email showed up in my inbox three weeks later confirming our permit for Angels Landing!
Thus commenced a weekend of panicked trip planning as I scrambled to pull together an itinerary and book accommodations that were already booked solid for the entire month of May.
Obviously it all worked out in the end. And I’m very glad it did, because we had a wonderful trip all around. But Angels Landing was one of the absolute highlights!
Table of contents
Getting a permit
The advance lottery system for Angels Landing runs on a seasonal basis; for us, this meant I entered in January for March-May permits. One entry allows you to choose seven days and times, and each person can enter only once. If your name is selected, you are assigned one of these seven options.
A small number of permits are held back for the day-before lottery – an option if you don’t get an advance permit and have some flexibility with your schedule while you’re in Zion. Of course, with this option there’s no guarantee you’ll actually get a permit.
However, even without a permit you can hike the first approximately 2 miles (3.2 km) and 1700 feet (520 m) up to Scout’s Lookout. It’s only the final stretch of trail up Angels Landing that requires a permit.
On that note, be sure to download or screenshot your permit before you enter Zion Canyon. There is no phone service inside the canyon, and there will be a park ranger stationed at Scout’s Lookout checking permits.
West Rim Trail
The trail for Angels Landing begins at West Rim Trailhead, which for most of the year can only be accessed via the free park shuttle (park entrance fee or America the Beautiful pass required). More information can be found in the link provided, but the short version is this: park at the Zion Canyon Visitor Center, board the shuttle, and exit the shuttle at stop 6, otherwise known as The Grotto.
There are three permit windows per day for Angels Landing. You should arrive at The Grotto at the time printed on your permit. Our permit was for 12:00pm (definitely not my first choice, it was already so hot), so we set off just a few minutes after.

Unfortunately, I’d ended our hike of The Subway the previous afternoon with an exceedingly painful and stubborn cramp in my calf, which was radiating pain all the way down to the outside of my foot. It was better than it had been 20 hours ago… but it was far from painless.
However, there was absolutely no way I was going to not make it to the summit. I’d been looking forward to this hike for too long. So with the help of a very painful calf massage from my husband, a much slower than normal pace, and the maximum allowable amount of ibuprofen, we set off toward Angels Landing.
(Allow me to digress for a moment and acknowledge that summit fever – the desire to make it to the top no matter the circumstances – is a very real and very dangerous thing. People end up in bad situations every year because of it. So when I say I was absolutely going to make it up Angels Landing, it was with that in mind. If the pain worsened to a point where I wouldn’t have been able to make it back to the trailhead, I would have stopped. I would have cried in disappointment. But I would have stopped.)
Luckily, the muscle gradually began to loosen as I walked, and within half an hour I was able to walk normally and without any pain.


The first approximately 0.5 miles (0.8 km) of this hike follows the Virgin River, gaining elevation gradually. It’s a nice warm up for the steeper terrain to come.
Once you reach the first switchback, get ready to climb. Approximately 900 feet (275 m) in the next 0.7 miles (1.1 km), to be exact. With the sun shining down on us and the 90°F (32°C) heat, it was a scorcher.


Right: ascending the final switchback
Refrigerator Canyon
Once you reach the top of this first set of switchbacks, you’ll find yourself at the mouth of Refrigerator Canyon, named for its cooler temperatures and limited sunlight. The shade was refreshing on such a hot day. So was the much more gradual incline.
Refrigerator Canyon is also an important habitat for the endangered Mexican spotted owl, and signs at the mouth of the canyon ask hikers to please speak quietly in the canyon so as to not disturb the owls. The quiet is important for their ability to communicate, hunt, and care for their young.
Given that it was the middle of the day, I wasn’t expecting to actually see an owl. But just a short distance into the canyon we came upon a collection of people huddled near the edge of the trail. Sure enough, there was an owl!
We were only able to watch it for about 30 seconds before it flew out of sight – this was very much a right place right time situation – but it was still an exciting wildlife sighting.


Right: Mexican spotted owl (this photo was actually taken on my previous trip to Zion; the owl we saw this time wasn’t close enough to get a good photo)


Right: climbing out of Refrigerator Canyon
Walter’s Wiggles
Be sure to catch your breath on your way through Refrigerator Canyon, because at the end comes one of the most famous parts of this hike: Walter’s Wiggles. This set of 21 short but steep switchbacks ascends over 200 feet (60 m) in just 0.1 miles (0.15 km) as it climbs out of Refrigerator Canyon.


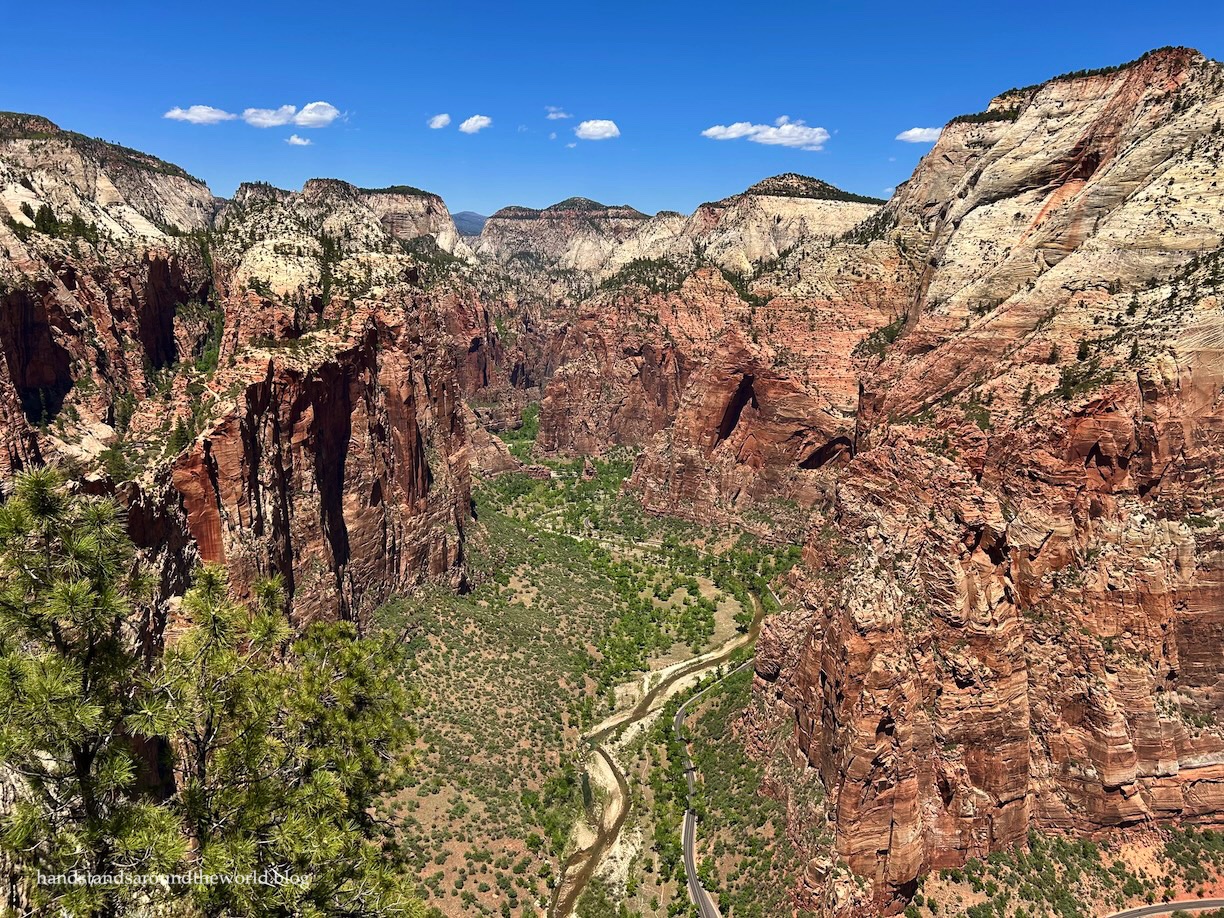
Scout’s Lookout
Once you reach the top of Walters Wiggles, Scout’s Lookout is just ahead. There is a bathroom here, as well as plenty of places to stop and take a break.

The view of Zion Canyon from here is pretty great too!
For anyone who couldn’t get an Angels Landing permit, is afraid of heights or exposure, or just generally unsure of their ability to hike Angels Landing, hiking as far as Scout’s Lookout is a great alternative. Yes, it’s steep in places. And it’s not an easy hike. But there are no narrow paths, it’s much less exposed, and it’s relatively easy to keep your distance from any steep drop-offs.


Angels Landing
If you do have a permit, after passing through the checkpoint at Scout’s Lookout, follow signs for Angels Landing and prepare for the biggest challenge of the day. Things are about to get spicy.
(And for anyone who is unbothered by heights and exposure, things are about to get fun!)
Quick PSA: if at any point you begin to feel unsafe through this section, please turn around. Injuries occur on Angels Landing every year, and there have been fatalities as well. I don’t say this to scare people away from this hike, but to emphasize the difficulty of this route. As long as you’re prepared (adequate water and food, proper footwear, etc.), careful, and staying within your ability level, this hike can absolutely be done safely.


It’s only 0.4 miles (0.6 km) to the summit of Angels Landing. However, you’ll be gaining nearly 750 feet (230 m) of elevation on a trail that is often only 1-2 feet (less than 1 m) wide. Slow and steady is the name of the game. Hold on to the chains, choose your steps carefully, and if you want to look at the view, take a photo, or take a drink of water, stop in a safe place before you do so.
Whenever possible, downhill hikers should also find a safe place to step aside to allow uphill hikers to pass. Uphill has the right of way.


From Scout’s Lookout, it took us about 40 minutes to reach the summit.
(And by the way: as you get closer, you’ll lose sight of the summit. If you find yourself wondering if you’re almost there, look at the nearest post. They all have numbers on them. The last one is #145 and is very close to the summit.)


Right: Pudgey at the summit
If you’re debating your ability to manage this hike, it’s important to consider not just the ascent, but the descent as well. On the way up it’s a lot easier to just not look down. On the way down, you really can’t avoid looking down. And sometimes it’s a very long way down.
The other section that may deter people is a very exposed step called the leap of faith. I’m shorter than average and I didn’t actually have to “leap.” It was just a large step while clinging to the chains. Nonetheless, it can be frightening.
(Of course, my much taller husband proceeded to just step right across as if it was any other section of trail. He claims it wasn’t a leap of faith, but rather a “step of certainty.” Personally, I think he’s just showing off.)


Right: me crossing the leap of faith
Wrap up
This was actually my second time up Angels Landing; I first hiked this trail about 15 years ago. It was popular back then, but not nearly to the extent it is now. Angels Landing has very much been a victim of social media exposure, which is why the permit lottery was put into place.
And honestly: thank goodness for the permits.
If even a fraction of the number of people who hike the other trails in Zion Canyon headed up Angels Landing, it would be extremely unsafe… not to mention a terrible experience for everyone. The entire stretch from Scout’s Lookout to Angels Landing would be one giant bottleneck.
I know permit requirements are annoying, and permits awarded via a lottery system are even more frustrating. But in this case, I don’t think there was any other choice.
My advice for those who really want to climb Angels Landing is this:
- Have everyone in your party apply for the advance lottery, and be flexible with your availability – weekdays (except holidays) and the afternoon time slots may be less competitive.
- If possible, have everyone choose different days and times.
- If you don’t win the advance lottery, plan to spend more than one day in Zion and have everyone enter the day-before lottery for each day of your trip.
- If you still don’t get a permit, hike to Scout’s Lookout anyway. You won’t get exactly the same views, but you’ll still be able to see Zion Canyon from above. From here, you can also hike the opposite direction without a permit, following the West Rim Trail along the edge of the canyon.
And if you do win the permit lottery?
Prepare for a challenging but truly worthwhile hike in Zion Canyon!
For information about planning a trip to Zion National Park, visit this post.
Up next: 48 hours in Page, Arizona
Leave a Reply to The Travel ArchitectCancel reply