For reasons I’m not entirely clear on, when I first planned our Zion trip I didn’t think to enter the permit lottery for this hike. Then a couple months later, I was messaging with a friend and mentioned this trip, and she asked if we’d gotten Subway permits.
Unfortunately, by this time the main lottery had already passed. However, two options remained: (1) in a couple weeks, any unclaimed lottery permits would be released and available for online booking or (2) we could enter the two days in advance lottery (25% of permits are held back for this) and hope for the best.
So on March 15th at 10:00am, I was sitting at my computer clicking reload on the permit page and hoping a permit for the day we needed had gone unclaimed in the initial lottery. To my surprise, there was one!
There are two options for hiking The Subway:
- Top-down: a 9.5 mile (15.3 km) point to point hike that involves rappelling and requires a wet or dry suit.
- Bottom-up: a 9 mile (14.5 km) roundtrip hike that does not require any swimming or rock climbing gear – though you will still end up wet.
As we aren’t rock climbers, we opted for the bottom-up route. Though no technical climbing is involved in the bottom-up route, the permit for both hikes is the same. I mention this because it’s called a “canyoneering permit,” which can be a source of confusion.
Though it’s considered the “easier” option, the bottom-up route is not a hike for beginners. The terrain is difficult, there is a serious risk of flash flooding, and the route is not well-marked or maintained. It’s important to have a map/GPS and strong route-finding skills for this hike.
The bottom-up route begins and ends at Left Fork Trailhead, located off Kolob Terrace Road. Note that this is located about 35 minutes from the main Zion Canyon section of the park. Your permit must be picked up in-person the day before or day of your trip at the Zion Canyon Visitor Center wilderness office (open from 8:00am-5:00pm; plan 20-30 minutes for the process). We picked up our permit the day before so we could get an early start.
The next morning, we headed west out of Springdale on Utah Highway 9 to Kolob Terrace Road. The road travels north through BLM land and then into Zion. Once you cross into the park, it’s just a few more minutes to Left Fork Trailhead.


We parked, put our vehicle permit in the window as instructed, geared up – which included some items we don’t usually bring with us, namely water sandals, microfiber towels, and our Subway permit – and set off.
Initially the trail is mostly flat; it’s a nice half mile (0.8 km) warmup for what’s to come. Because here’s the thing: the trailhead is up on the canyon rim. The Subway – and most of the hiking route – is down at the bottom. Way down.
When researching this hike, I’d read that the trail drops almost 600 feet (180 m) in half a mile (0.8 km). Despite that knowledge, I think some part of me was clinging to the hope that it was an exaggeration.
As soon as we reached the canyon rim, it became very clear that it was not.

And so we carefully began to pick our way down the rocky terrain. It was very slow going, and I was very grateful for my hiking poles. I’m honestly not sure how I would have done any part of this hike without them.


When you get to the bottom of the canyon, STOP.
Look around you and make note of your location. Take photos of your surroundings. Make sure to identify recognizable landmarks; from down in the canyon, everything tends to look the same.
The reason this is so important is because there is only one small sign pointing hikers away from the creek and back up to the top of the canyon for the hike out. However, if you’re on a slightly different trail – and there are many of them down here, so that’s highly likely – you won’t see the sign and could easily miss the turnoff and continue hiking down the canyon. It happens to multiple hikers every year.


Right: this is the other feature we were looking for on the way back up. The grey color of the rock made it stand out from the mostly red canyon walls. The trail travels along the far right side of this photo.
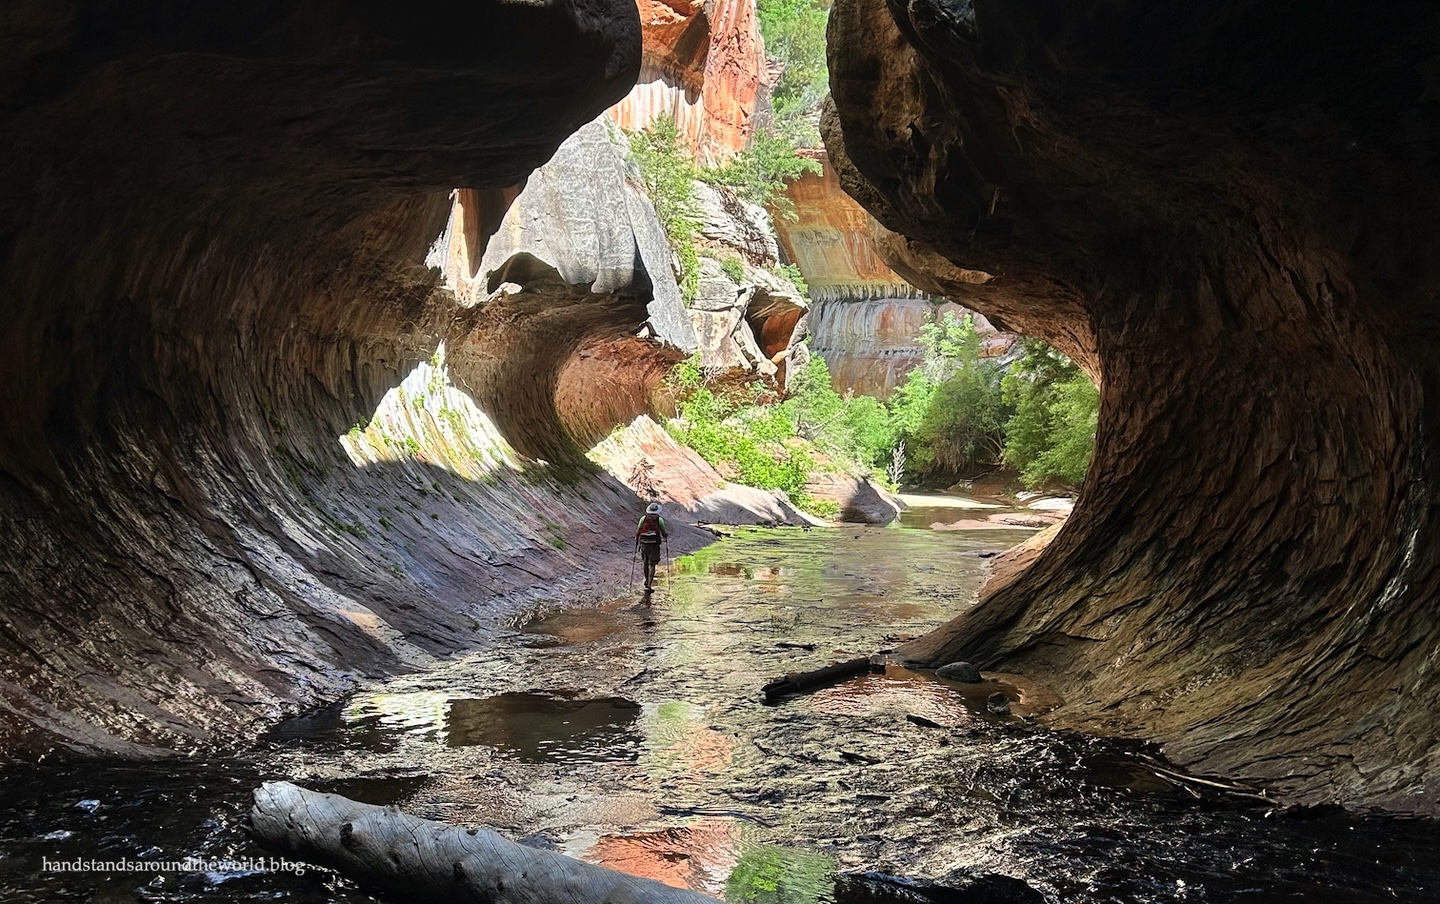
Now that we’d reached Left Fork North Creek, the rest of the hike was basically a choose our own adventure situation. There was always at least one visible trail, and often there was more than one.
(Note that after heavy rains and flooding, these paths may be covered by debris or washed away entirely, which would further complicate route-finding. As long as you’re following the creek, though, you’ll get there.)
The hike is also uphill from this point on, though the elevation gain was so gradual I barely noticed it. In fact, in the aftermath I was shocked to learn that The Subway itself is 350 feet (105 m) higher than the trailhead!
Anyway. For the first mile (1.6 km) or so, we found the path to be pretty intuitive. We crossed the creek 4 times, and all crossings were navigable without getting our feet wet.

However, we soon reached a crossing that was going to require stepping in the creek, meaning it was time to switch to our water sandals. We packed our Keens for this purpose, and they worked well.
Shoes now securely strapped to our packs, it was time to get our feet wet. And while the water felt really good on the return hike when the sun was reaching the bottom of the canyon, this early in the morning we were still fully in the shade. It was cold!


For the next couple miles, we crossed the creek more times than I could count, always seeking the path with the fewest apparent obstacles. It was slow going. Most accounts say it takes at least 6-8 hours to complete this hike, and we found that to be pretty accurate; it took us about 6 hours, not counting the hour we spent at The Subway itself.


With about 1 mile (1.6 km) to go, sticking to dry land whenever possible had become an exercise in futility. At this point, it was much more realistic to just walk up the middle of the creek.
So we did, leaving the water only twice to traverse around a couple obstacles too large to go over.


As our journey up the creek continued, the water remained shallow but the canyon walls were closing in. I felt small and insignificant… and acutely aware of the danger we would be in should a flash flood occur. Thankfully there was no rain in the forecast anywhere in the region, and the park had issued a flash flood level of “not expected” for the day.


Right: it’s starting to look kind of subway-esque… must be getting close!
At long last, the creek made a turn to the right and suddenly there we were, staring ahead at the most unusual slot canyon I’ve ever seen.


A group of hikers was departing just as we arrived, and once they rounded the bend we found ourselves completely alone!
The sun had not yet reached the canyon floor, and the air inside The Subway was chilly. Not so appealing when you’re walking up a creek.
And we were about to get even colder.
At the back of The Subway is a short but very narrow section of the canyon that leads to a waterfall. If we wanted to see it, we’d be walking through hip-deep water.
At first, the answer was a resounding no. We were only wet up to our shins and were already cold. We were absolutely not going in any deeper and getting our clothes wet.


But after a brief discussion, we realized after all the effort we’d put in to get here, it would be a shame to not walk the last 100 feet (30 m) or so.
So off came our packs and outer layers, and into the water we went.


Using our hiking poles, we were able to probe around and find the shallowest areas, and I ended up making it to the waterfall and back without getting my shirt wet. My shorts, however, were drenched.
(My husband, being eight inches taller than me, did not get quite as wet.)


We then made our way back through The Subway and found a nice sunny spot to dry off, warm up, have a snack, and enjoy this destination we’d worked so hard to reach. Two solo hikers and one couple came and went while we were there, but other than that we had the place to ourselves for almost an hour!


As a side note, while we started our hike early for purposes of obtaining parking (the lot was less than half full when we arrived just shy of 8:00am but overflowing upon our return), one thing we hadn’t taken into consideration was lighting. In all honesty, we got lucky. When we arrived at The Subway around 11:00am, it was mostly in the shade. By the time we left an hour later, it was partially in the sun and the lighting for photos was much less ideal.
Now that the sun was reaching the bottom of the canyon, having our feet in the water felt really nice. We ended up just staying in the creek for the first couple miles of the hike out, and our pace was actually slightly faster than it had been on the way in.
As the canyon opened up, we were keeping a close eye on our GPS app and our surroundings to ensure we didn’t miss the trail back up to the canyon rim. We soon identified our main landmark – the half-red, half-grey rock of the canyon wall we’d descended – and located the sign pointing us back toward the trailhead.
Now it was time to ascend the 600 feet (180 m) we’d hiked down first thing this morning.
As brutal as it was to climb back up with the sun beating down on us after having already hiked 8 miles (12.9 km), we were actually faster on the ascent. Don’t get me wrong; we were slow in both directions. But descending such steep terrain without slipping was, for me, at least, harder than going up.
Unfortunately, by the time we reached the top, my right calf had worked itself into a giant knot. The pain was radiating down to the outside of my foot, and I pretty much hobbled the final half mile (0.8 km) back to the car. Not a fun end to what was an otherwise amazing hike.
In fact, my husband declared it one of his favorite hikes he’s ever done, and it’s absolutely earned a place on my all-time favorites list as well. This is one of those hikes where the journey is the destination all on its own.
Of course, in this case, the actual destination was pretty spectacular too.
Would I do this hike again? Absolutely!

Up next: hiking Angels Landing
The Important Stuff:
- Getting there: the bottom-up route to The Subway begins at Left Fork Trailhead on Kolob Terrace Road in Zion National Park. The road is paved and any vehicle should be able to make the drive.
- Permits: a permit is required for this hike, and can only be obtained through the canyoneering permit lottery system. Through the lottery, there are three options: apply for the seasonal lottery (75% of permits available here), attempt to claim any unclaimed permits that are released a few weeks after the seasonal lottery, or apply for the two-days-beforehand lottery (25% of permits available here). If you obtain a permit, it must be picked up in-person the day before or day of your trip at the Zion Canyon Visitor Center wilderness office.
- Fees and passes: in addition to a hiking permit, a Zion National Park entry fee ($35/car for 7 days) or America the Beautiful pass is required. Even though you don’t pass through an entrance station en route to this trailhead, the fee is still required. Place your pass or receipt on your dash.
- Hiking: distance will vary slightly depending on the exact route you take up the canyon, but the average roundtrip distance for this hike is 9 miles (14.5 km) with 2400 feet (730 m) of elevation gain.
- Where to stay: to get an early start, I recommend spending the night somewhere nearby. Options include dispersed camping on the BLM land at the beginning of Kolob Terrace Road, Lava Point Campground at the other end of Kolob Terrace Road (reservations not accepted), or a campground, cabin, vacation rental, or hotel off Utah Highway 9 in the towns of Virgin or Springdale. Sleeping in your car at the trailhead or camping outside of an established campground is not allowed in Zion National Park.
- Water: the rivers and streams in Zion National Park are contaminated with toxic cyanobacteria and the water is not safe to drink, even with treatment or filtration. While there is no risk to getting the water on your skin, use caution if you have open wounds on your legs and feet, as this could be cause for concern. Lastly, if you end up in the water, be sure to thoroughly sanitize your hands before touching your face or eating.
- Other: this hike should NEVER be attempted if there is a chance of precipitation in Zion or anywhere upstream of Left Fork North Creek. Flash floods are very real and very dangerous, and once you’re down in the canyon, there is absolutely no escape route. Check the weather forecast, check the flash flood forecast, keep an eye on the sky, and be prepared to turn around at any time if it starts to look potentially stormy.
Leave a Reply to kagould17Cancel reply